RSS Feed

Category Archives: How to …

Modern Brickies are ‘Taking the Pee’

Posted on

‘Liquid gold’: students make world’s first brick out of human urine.

The bio-brick created by students in Cape Town mixes urine with sand and bacteria, which they say is a world first. Article from The Guardian newspaper.

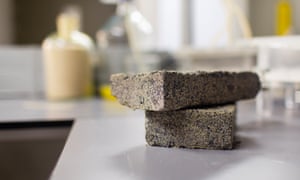
Urine bricks created by students at the University of Cape Town.

Creating a truly sustainable construction material is now a possibility

Vukheta Mukhari

“Students in South Africa have created the world’s first brick made from human urine.

The bio-brick was produced by students from Cape Town, who collected urine from specially designed male urinals at the university’s engineering building and mixed it with sand and bacteria.”

More from the article … “Bio-bricks are created through a natural process called microbial carbonate precipitation, said Randall, similar to the way seashells are formed. Loose sand, which has been colonised with bacteria that produces urease, is mixed with the urine. Urease breaks down the urea in the urine, producing calcium carbonate, which cements the sand into shape.

While regular bricks are kiln-fired at temperatures of 1,400C and produce large amounts of carbon dioxide, the bio-bricks do not require heat.”

Original article: https://www.theguardian.com/global-development

How to Fix Corroded Battery Terminals

Posted on

InstructablesInstructables

Original Article
https://www.instructables.com/id/How-to-Fix-Corroded-Battery-Terminals/?utm_source=newsletter&utm_medium=email

HOW TO FIX CORRODED BATTERY TERMINALS
By lonesoulsurfer in TechnologyElectronics14,62911033

Introduction: How to Fix Corroded Battery Terminals

About: I’ve always liked pulling things apart – it’s the putting back together again that I have some issues with. More About lonesoulsurfer »
Many a time I’ve managed to get my hands on some electronic gizmo only to find that the battery compartment totally corroded. It’s usually one of the main reasons I think that people throw toys and whatever else takes batteries away.

The corrosion is caused by potassium hydroxide which can leak out of alkaline batteries (these are the usual types of batteries you put inside toys etc). All batteries discharge, either through use or just slowly through the production of hydrogen gas which forms pressure in the battery. Eventually that pressure will find a way out through a seal or as the battery ages, through corrosion or rust in the outer shell.


Once a leak forms then the best thing to do is to get rid of the battery and neutralise the acid. However, if you don’t get to it in time, then the corrosion will grow and spread out of the battery which causes oxidisation and corrosion of the terminals making your device caput.

This Instructable will go through a couple of ways that you can fix your device to bring it back to life again. The first is the most extreme corrosion where the terminals have to be replaced, the second is a small amount of oxidisation which only needed the acid to be neutralised and the terminals to be cleaned.

You can take precautions though to stop this happening such as not mixing different battery types in the same device, replacing all of the batteries at the same time, storing in a dry place and at room temperature, and removing batteries for storage of devices. I’m inherently optimistic (and also lazy) so I’ve never taken any of these precautions but it’s definitely good practice, especially with expensive electronic goods.

Add TipAsk QuestionCommentDownload
Step 1: Parts and Tools

Your parts are going to be any electronic goods that need terminal cleaning and/or relacing. The following though will come in handy when you are going this type of work

Tools

1. Battery Holders. I have a bunch of these lying around which are good for projects. You can also use the terminals from them to repair other electronic goods.

2. Small files

3. Baking soda

4. Small paint brush

5. Needle nose pliers

6. Ear cleaners

7. Wire cutters

8. Soldering iron

9. Rubber gloves – to protect your skin from the potassium hydroxide. I have touched it before and it does mildly irritate the skin so it’s best to use gloves when handling.

10. Eye protection – self explanatory

Don’t use your fingers to try and remove the batteries. Although the acid isn’t very strong, it will still irritate your skin (I know as I’ve touched it before!).

Steps:

1. Place a set of rubber gloves on and some safety glasses

2. Use a small screwdriver to pull the batteries out. The glasses here are very important as it is easy to flick small pieces of the corrosion whist pulling out the batteries.

3. Sometimes that batteries can be so corroded that they virtually weld themselves to the terminals. In this case you will need to use a large screwdriver and maybe some pliers to remove them. You’ll probably rip out the terminals as well so be careful you don’t pull any wires out at the same time

4. Dispose of the batteries in a plastic bag.

Next thing to do is to remove all of the corroded terminals. It can be tricky sometimes to do this if they are severely corroded as bits can break off and the grooves in the battery holder can get clogged-up.

Steps:

1. Use a small, thin screwdriver and push this between the top of the terminal and the battery holder. This should bend out the terminal

2. With a pair of needle nosed pliers, grab hold of the terminal and pull it out.

3. If the terminal has solder points, make sure you de-solder or cut the wires and cut them away to be able to remove them easily

4. Dispose of the corroded terminals once removed

Add TipAsk QuestionCommentDownload
Step 4: Cleaning the Battery Cover
Picture of Cleaning the Battery Cover
Picture of Cleaning the Battery Cover 2 More Images
The battery holder that I fixed came away from the torch so make it easy to wash and clean. However, this might not always be the case as it will depend on what type of electronics you are cleaning.

Steps:

1. You can neutralise any leftover acid with some vinegar or baking soda and water paste. I use the baking soda trick in the other example I do in the Instructable.

2. Next if possible, wash out the bottom of the battery holder and clean any of the old acid away from the case. If you can’t remove the battery holder, then you are going to have to be a lot more careful when cleaning the area. Use a damp cloth instead of running water and remove any leftover acid

3. Next, you may need to remove any pieces of terminal or corrosion that is in-between the grooves that the terminals sit in. Use something thin and sharp to remove anything lodged inside the grooves.

4. Lastly, give the area a clean with some Isopropyl Cleaning Alcohol to remove any last traces of the acid.

In some cases, the corrosion is so bad that you need to replace the terminals inside the battery compartment. One of the easiest places to get these is from old battery holders. You could also grab the terminals out of any old electronic parts

Steps:

1 If your battery terminals have tabs on the back, make sure you lift these up first. You might also need to de-solder any wires on them if you got the terminals out of a toy etc.

2 Next, use a small screwdriver to push them out of the battery holder. Just place the tip of the screwdriver into the bottom of the terminal and lift it out of the battery holder. They are held in place by a couple of grooves in the side of the battery holder so should come out relatively easily.

Add TipAsk QuestionCommentDownload
Step 6: Modifying the Battery Terminals

Chances are you will need to modify the battery terminals so they will fit into the batter holder You can do this pretty easily with some wire cutters and a dremel if you have one.

Steps:

1 First, try and fit one of the terminals into the battery holder grooves. If it does fit, then you can probably ignore this step and move onto the next. If not, then you will need to modify it.

2 Trim the sides of the terminal with some wire cutters and try to push into the grooves again in the battery holder

3 I also had to add a small slit into the terminal in order for them to fit which I did with a dremel.

4 Once you have modified, it’s then time to add them to the battery holder

Steps:

1. The first thing to do is to determine the orientation of the terminals. You need to make sure that the spring section on the terminal will be touching the negative part of the battery and the flat section is touching the positive.

2. Usually you can just look on the bottom of the battery holder and there will be images or the orientation. If not, then work out where the positive wire is going to be connected to the terminal and use this as a guide on the orientation of the terminals.

3. Place the terminals into the battery holder grooves and push into place. If they are a little loose then usually the batteries will hold them into place. However, you can slightly bend the terminal and push it back into the grooves which will make the fit a little tighter.

4. Once you have all of the terminals in place, solder the positive and negative wires to the solder points on the terminals.

Steps:

1. Before you screw everything back into place, add some batteries and make sure everything works as it should.

2. If everything works ok – replace the screws and covers and whatever else needs replacing to finish off your part

3. Lastly, give it another test and make sure it works

4. Now if you don’t want to have to do this all over again, go back to the intro and follow the precautions

This is really the most extreme case of having to fix battery terminals. The next sample, I think is more common and is more oxidisation of the terminals due to some leakage of the batteries. It’s easier too to fix!

I found this cool, vintage mike at the tip and wanted to try and get it going again. Initially I tested it not knowing that it needed an AA battery and thought it was probably something to do with the wiring. After un-screwing the case however I discovered that it needed a AA battery to run. The battery had been in place for some time and the terminals were oxidised and had some minor corrosion damage. I could have replaced the terminals but decided it would be easier just cleaning them

Steps:

1. Remove the old battery with a screwdriver and dispose of. Even though there was not as much damage and leakage as the first sample, I still made sure that I wore gloves and eye protection

2. You can see in the images that there is a little corrosion and acid on the end of the terminal but that the terminal itself looks relatively unaffected structurally.

3. The brown streaks you can see running through the middle of the battery holder is actually glue that has discoloured over time, not corrosion

4. The next step is to neutralise the acid

Next thing to do is to neutralise any residual acid left of the terminals. There are a couple ways you can do this; one is with vinegar (I didn’t have any on hand so didn’t go with this option) two, with baking soda which is what I used.

Steps:

1. First thing to do is to make a paste with the baking soda and a little water. You want to make it not too runny as the water could affect the electronics in whatever you are fixing. However, at adverse is true as well, too thick and it won’t spread well. You need to find the goldilocks mixture somewhere in the middle

2. Once you are happy with the mixture, add a little to each terminal with a small paint brush or something similar

3. Wipe off any excess from the terminals before it dries.

4. Now that the acid has been neutralised, it’s time to clean-up the terminals

You need to remove any oxidisation and corrosion from the terminals. I find that the best thing to use is a small file but you could use sandpaper as well

Steps:

1. Use a small, fine file on the terminal until the oxidisation and any corrosion is removed. You may not be able to get it all off but sure you get as much as possible.

2. Once you have removed the oxidisation, give the terminals a clean with some isopropyl alcohol

3. You can sometimes remove the terminals from the grooves without having to undo any screws or removing any wires. It sometimes makes it easier to file if you can do this – just be careful that you don’t break any wires etc.

Steps:

1. Once the terminals are clean and back into place, you can add a battery/s and test.

2. As before, it’s best to test before you screw everything back into place

That’s it! Hopefully you have managed to bring something back to life again with only a little bit of work.

Do you have any other tips? Let me know in the comments

Did you make this project? Share it with us!

ReplyUpvote
Good article, and I’m glad to see that I’ not the only one who tries to save electronic toys, instruments, etc. However, baking soda only works on the old acid-zinc or carbon batteries, not on alkaline, NiCAD or NiMH ones.

Direct from Duracell.com:

To clean any leakage of the following battery types, Alkaline, NiCAD and NiMH batteries, use either one tablespoon of boric acid in one gallon of water or a mixture of equal amounts of diluted vinegar or lemon juice with water (50/50 ratio).
BTW, the term is oxidation, not oxidisation. A strong base (also called caustic, or alkali) can be just as destructive or harmful to skin or eyes as a strong acid. Some metals are affected as much or more by caustics than acids (such as aluminum or zinc – which includes brass, which is a copper/zinc alloy frequently used in battery terminals). From personal experience, handling cement (strong caustic) or concrete – either wet or dry – for any length of time with bare hands will be painful lesson to anyone careless enough to do it.

1
None
russ_hensel
13 minutes ago on Step 10

ReplyUpvote
You may clean with vinegar, but do not nuturalize acid with it; it is acidic.

None
mbkafil52
24 minutes ago

ReplyUpvote
My problem is that the battery compartment of my Apple key board is jammed due to battery corrosion inside. Any bright ideas how to unlock it?

None
DavidE341
25 minutes ago

ReplyUpvote
Very good instructions! Done this many times myself. I would only add that I also use a water displacement/penetrating oil (e.g., WD40, Kroil) during the sanding phase as it helps cut through the surface rust.

None
CarletonS
31 minutes ago on Introduction

ReplyUpvote
Great info. I’ve had many instances where the batteries have leaked after prolonged non-use. I’ve always wondered if just removing the oxidized terminals would do the trick, only to find that any little bit of acid left will cause the batteries to leak again. Thanks so much for educating this non-scientific person. 🙂

None
FrankB170
33 minutes ago on Step 7

ReplyUpvote
I never thought of the idea of snagging the springs and terminals out of those Radio Shack battery holders. Great idea.

(Please change your references to acid. KOH is actually a base and using baking soda seems counterproductive. Still, great article and thanks.)

None
ThirdEarthDesign
34 minutes ago

ReplyUpvote
Great tips and information, thanks for the I’ble!

None
KenL39
8 hours ago on Step 10

ReplyUpvote
Vinegar is acid so it won’t neutralise acid from the battery- the baking soda is alkaline so it will work

2 replies
None
EwenF2
Question 36 minutes ago on Introduction

AnswerUpvote
If the corrosion is caused by potassium hydroxide, which is an alkali and comes from alkaline batteries, why do you call it acid and talk about neutralising it with vinegar, which is also an acid? Since it is alkaline, you cannot neutralise it with baking soda, which only reacts with acids.

1
None
mf70
44 minutes ago

ReplyUpvote
Another tool that helps in cleanup is a fiberglass scratch brush, such as:

None
SpikeH3
48 minutes ago on Introduction

ReplyUpvote
I thought vinegar was an acid (acetic acid?) – so how can it neutralize acid?
But an excellent and useful article. Never occured to me to cannibalize cheap battery holders.

None
Deltic
49 minutes ago

ReplyUpvote
I’ve found that lemon juice, an old toothbrush & the disposable variety of nail file do the job nicely.

None
SallyC47
Tip 49 minutes ago

ReplyUpvote
For really fine wire, I burn the plastic and while its still warm just pull it off.

None
wdkdave
50 minutes ago

ReplyUpvote
if you don’t have vinegar or don’t like the smell of vinegar – lemon juice will also do the trick, and again the corroded residue is a base not an acid so needs a mild acid to remove it.

1
None
gm280
21 hours ago

ReplyUpvote
Spot on with everything you stated. I’ve been down this road a few times my self. And if you don’t have other battery holders to donate parts from, you can always use a tin can (not aluminum types) and cut out your own terminals. They solder that same and are not that hard to form into replacement terminals. Always better then throwing away the electronic item. Thumbs Up!

N.B.

ReplyUpvote
I agree for bakin soda (a base from the chemical point of view) able to neutralize acid residual. But using vinegar (containing acetic acid) imho is a non sense, even if could it be acts as a deagreasing agent.
Some great ‘frugal ideas’ from Treehugger.

Posted on

Here it is again: Saving oneself a load of cash is somehow less daunting than striving for environmental virtuousness, but the end result is the same.

A whole lot of recipes that do not include meat.

17 recipes for an unforgettable vegan barbecue

Frugality is environmentalism

Archery Blogg – Archery Through the Ages.

Posted on

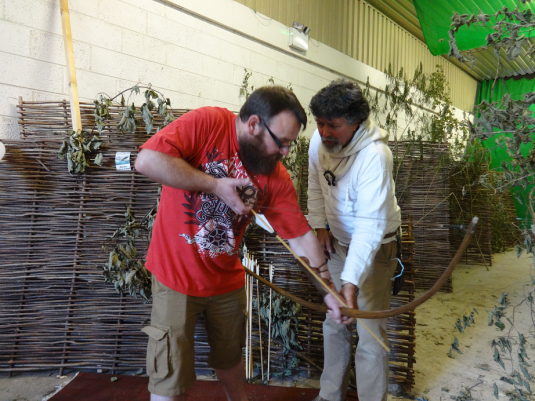
Glenribbeen Archery has moved on and while still offering 1-on-1 lessons in archery (and traditional Irish music) since the accommodation has closed I now have a new business teaching medieval archery and telling stories based on the 30+ arrows I have dating from Mesolithic to 16th century. Each different and each with a different story.

See more at: archerythroughtheages.bloggspot.com

Deirdre decided to be daring


All ages catered for.


Families or individuals everyone gets 1-on-1 coaching.


Chain mail and copper wrist-band, a handful of arrows and a bow – ready to go.

TripAdviser comments: Glenribbeen + Archery in Waterford Museum.

Posted on

Glenribbeen Eco Lodge – +35354499 or call Peter direct on +353866017176

Glenribbeen Eco LodgeTripAdviser comments
Glenribbeen:

“Friendly, Quiet, and Great Food!”

Reviewed 8 November 2011

We were greeted with a toasty warm wood stove going, and Els right away brought out some tea and cookies, which we enjoyed by the fire while reading their many books about Ireland and the local area. The lodge is very tastefully decorated, without all of that stuffy Victorian pink lace and doily decoration you can typically find in a B&B. Upon reading the other reviews, I have to agree that the breakfast was amazing. Our first morning we had Dutch pancakes with rashers and maple syrup. I’m still dreaming of it. Second morning we had the baked eggs, which were also fantastic. And the coffee was strong and delicious, a serious concern of ours in a country that drinks a lot of tea.

Peter is an incredibly interesting man and he would come out in the morning to talk to us while we waited for breakfast. I could have sat there all day listening to him (and eating Els’s pancakes). He recommended several things for us to see and do, while giving us mini history lessons in everything from the Titanic to why they drive on the left side of the road. I wish we made some time for an archery lesson with him.

The whole place is very clean and everything has been thought of in an eco-conscious way. Yes, the bed is creaky as are the floor boards. We got used to it after our first night. Once you convince yourself it’s all part of the charm, you start to roll with it. The surrounding countryside is totally quiet and peaceful. A squeaky bed is a very small price to pay for a fantastic stay in a beautiful location with great hosts and insanely delicious breakfasts. I’d go back in a heartbeat. Make sure you get a chance to feed the hens some grapes!

  • Stayed November 2011, travelled as a couple


—————————————————————-

“Lovely would definately recommend Baked Eggs for breakfast!”

Reviewed 25 August 2011

I stayed at the Lodge as we were attending a wedding locally, our room was lovely clean and bright there was everything you need hairdryer, kettle, books, local guides etc right down to a chocolate snack biscuit on a tray and a carafe of water, we were asked what we would like for breakfast and as a I don’t eat meat I have gotten used to beans on toast with a tomato thrown in but as Els and Peter are vegetarians I received a wonderful plate of fresh fruit garnished with flowers, followed by the house special of baked eggs delicious! fresh orange, breads, cereals you name it the choices. I work in Tourism and I was very impressed with the hospitality and service received, B&B prices were very reasonable.

  • Stayed August 2011, travelled as a couple


————————————————————–

“Wonderful hospitality in a beautiful place. Top notch!!!”

Reviewed 14 August 2011

Peter and Els are wonderful people and right from the moment we met them, I knew we made the right choice of a place in Lismore. Their home is in a beautiful setting a short distance from the town of Lismore and quite an experience with gardens, hens, two wonderfully friendly dogs and within an easy walk to a river where the salmon fishers are busy. The house itself has a wonderfully large and comfortable dining/sitting area where breakfast is served and where we often found ourselves spending time chatting with Peter and/or Els and enjoying a cup of tea or coffee after a day of sightseeing. We learned A LOT of history about Ireland and Peter let us read books from his extensive library…one of which we borrowed and will send back. I had thought the breakfasts were great up to this point on our trip, but Peter and Els really go over the top with beautiful presentation and extraordinary and delicious food. I guarantee that you will not get a better breakfast in Ireland!!! Peter and Els are very approachable and helpful. A couple of evenings, we picked up some meat to BBQ and Peter set up the grill and provided the dishes, etc… We never felt rushed in our time with them as they always seemed to have time for whatever need or question we had. The room was comfortable and clean and had a TV/DVD combo in it. I loved the snacks and waters! Overall a great experience and highly recommended!!!

  • Stayed August 2011, travelled with family


“BEST B&B in Ireland”

Reviewed 2 August 2010

From the moment we arrived we were in heaven, we were treated with such a warm welcome. Peter was always willing to chat and eager to make our stay as pleasent as possible.we ate amazing breakfasts- such good options on the menu with fresh fruit and amazing homemade brown bread on the side! the atmosphere in the lodge was very relaxed and we made the most of the amazing servies which the lovely couple provided such as use of their canoe, bikes, various fishing equiptment, instruments, books, garden hammock, kites and BBQ… Iv never even heard of such extras being provied in another B&B… expecially as its half the price!! we even had a 5 star hotel booked for the last night and cancelled becuase we would rathar the tranquil surroundings of Glenribbeen lodge!! they made our stay amazing, offering information, conversation and even lifts to and from the pub. would recomend it to absolutly everyone and cant wait to return.

  • Stayed July 2010, travelled as a couple


——————————————————————

Experience Medieval Archery

Reviews from Museum of Medieval Treasures, Waterford.

TripAdviser reviews of Archery Through the Ages.

http://www.tripadvisor.ie/Archery & Waterford

Getting a strainght-line.

Demonstrating ‘Tip – nock – hand – elbow’ to create a straight line to enhance accuracy.

“Visit to the Medieval Museum of Waterford”

Reviewed 14 July 2015

I’ve had a delightful weekend in Waterford city and the Museum was one of the best experiences of all. However what really stood out by me was the archery lesson I got in the museum. The person ‘Peter’ who introduced me to archery was greatly animated which made it an altogether enjoyable experience for me. He managed to introduce me to some skills and I was able to shoot arrows successfully and this was all combined with his abundance of knowledge about the history of archery. His lesson was like a throw back into medieval times; no visit to the museum would be complete without an archery lesson!

Visited June 2015
http://www.tripadvisor.ie/ShowUserReviews-g186638-d319005-r288682037-Waterford_Treasures_Medieval_Museum-Waterford_County_Waterford.html#

Reviewed 7 January 2015

Waterford’s Museum of Medieval Treasures has a great policy of bring things to life and getting enthusiastic people in to show some real crafts and skills as practised in 9th – 16th century Waterford (Ireland’s oldest city). A famous glass-cutter is working in the foyer and below are figures from history demonstrating coin-minting and archery (have a go!!) as well as displaying wood and leather work and tools.

Visited January 2015

DSC00507.JPG

“wonderful museum”

Reviewed 19 July 2015

Interestingly laid out history of the area. Not just the usual dusty chronological arrangement. Best part for us was the medieval archery tutorial and lesson given just inside the door by a local savant, Peter O’Connor .

Visited June 2015
http://www.tripadvisor.ie/ShowUserReviews-g186638-d319005-r290531037-Waterford_Treasures_Medieval_Museum-Waterford_County_Waterford.html#

DSC00110

“Peter, the medieval archer, was the best part!”

Reviewed 4 August 2015

Visited this museum in July 2015 and the best part was meeting Peter, the archer! He’s stationed right at the front door, ready to give you an amazing talk about medieval archery and teach you how to shoot the longbow. He’s an absolute wealth of information and very engaging to speak with. I enjoyed meeting him so much I’ve taken to following him on his Facebook page “Archery Through the Ages”, where he regularly supplies interesting historical points and plenty of posts of his daily visitors at the museum. It’s obvious he enjoys what he does!

The museum was fantastic. It takes approximately 45m to go through with the provided audio guide. The Cloth of Gold Vestments from the 1400s are the highlight of the exhibitions.

Visited July 2015
http://www.tripadvisor.ie/ShowUserReviews-g186638-d319005-r295813650-Waterford_Treasures_Medieval_Museum-Waterford_County_Waterford.html#


“Medevial times bought to life”

Reviewed 23 July 2015

this is a great museum and shows what life in Waterford was like in the dark ages with great displays and live action such as the archery display with the long bow. well worth a visit. unfortunately we didnt give ourselves a lot of time as we were only intending to visit the Crystal factory and stumbled across this museum and teh viking quarter. I would recommend that you ive yourself a full day to visit these three attractions as well as Waterford city itself which is stunning.

Visited July 2015
http://www.tripadvisor.ie/ShowUserReviews-g186638-d319005-r291686087-Waterford_Treasures_Medieval_Museum-Waterford_County_Waterford.html#


“Interesting day out”

Reviewed 9 July 2015

Fantastic fun. We had a 6 year old and a 2 year old with us and they both enjoyed it. We got a guided tour from the Curator himself and he made it very interesting and quite funny also. There was also a man in the lobby who was teaching archery and all about different types of bows and arrows….needless to say that the 6 year old LOVED that! It only cost €14 for the guided tour, and we were able to go back around as often as we liked on our own afterwards.

Visited July 2015
http://www.tripadvisor.ie/ShowUserReviews-g186638-d319005-r287096441-Waterford_Treasures_Medieval_Museum-Waterford_County_Waterford.html#

House of Glass

“Thoroughly enjoyed!”

Reviewed 2 July 2015 via mobile

We visited here on Wednesday 1st July and on arrival, we were greeted by an archer. What a lovely and knowledgeable man! Very much enjoyed our chat with him and my husband loved the small archery demonstration. Then we had the luck of being on the guided tour with the museum director….what a treat! A pleasure to view the museum with a man so truly passionate about it…full of interesting anecdotes and stories. My husband is NOT a fan of museums….he came purely because I wanted to go. But he loved it and really enjoyed the tour. I would highly recommend this to everyone…in my eyes, it’s a must-do in the wonderful city of Waterford.

Visited July 2015
http://www.tripadvisor.ie/ShowUserReviews-g186638-d319005-r285035117-Waterford_Treasures_Medieval_Museum-Waterford_County_Waterford.html#


“Above expectations – better than Wford Crystal!”

Reviewed 31 August 2015

Was thinking about going to Waterford Crystal but realised how boring that would be. Ducked into the Medieval Museum and went on the guided tour. Found it highly informative and good fun. Archery lessons on hand for 5euro! Downstairs cave is great and the coin press is fun. Floors one and two have some interesting stuff but really do recommend the guided tour to get the most out of it. Our tour guide was really excellent, nice young lady, good humour. The shop is FANTASTIC with helmets and glass cutting live.

Visited August 2015
http://www.tripadvisor.ie/ShowUserReviews-g186638-d319005-r305189201-Waterford_Treasures_Medieval_Museum-Waterford_County_Waterford.html#

DSC00115

And release…

“never knew waterford was so interesting .”

Reviewed 26 July 2015

we were met at the entrance by a chap in medieval gear who offered to demonstrate the intricacies and development of medieval archery . what followed was one of the most interesting and absorbing 45 mins in a museum ever . the guide , peter ,was a mine of fascinating and enjoyable facts and figures coupled with an encyclopedic knowledge of his subject , all delivered in a witty and friendly manner. an expiring parking meter forced us to leave or we would have stayed much longer .
we returned the next day and spent several hours touring the rest of the museum .a well laid out series of exhibits explained by knowledgeable guides armed with lots of relevant background information meant we spent a thoroughly enjoyable and informative day .(still preferred the bows and arrows) . wonderful !

Visited July 2015
http://www.tripadvisor.ie/ShowUserReviews-g186638-d319005-r292614211-Waterford_Treasures_Medieval_Museum-Waterford_County_Waterford.html#

Proud Papa lll.png

“A Must-Do Experience In Waterford”

Reviewed 10 September 2015

Notwithstanding that we have been in Waterford on a few occasions since the Medieval Museum opened in 2013, we just thought it would not be worth the time.

Then, earlier this week, we were invited on a tour of the museum and thought we would see what’s on offer.

Well, we were very impressed.

This is much more than a museum; more a series of living history experiences that is brought to life by a team of passionate staff. As soon as you enter, the experiences unfold in front of you with archery demonstrations. You can even get an archery lesson for an additional €5.

Being on a guided tour will make a huge difference to your experience. Our guide was excellent and contextualised the history of Waterford against the backdrop of Irish, British and European history.

All the exhibits are presented in an informative fashion. The piece-de-resistance must be the gold-braided vestments and the story about how they were uncovered. We won’t spoil it by revealing more on here.

In conclusion, we thoroughly enjoyed our experiences at The Medieval Museum. It is great value too at €7.

Visited September 2015
http://www.tripadvisor.ie/ShowUserReviews-g186638-d319005-r309205371-Waterford_Treasures_Medieval_Museum-Waterford_County_Waterford.html#

sigtrygg-lord-mayor

Leave a lighter footprint: green funeral and burial tips

Posted on

Leave a lighter footprint: green funeral and burial tips

Worldwide, more than 50,000,000 people pass away each year. Traditional burial and cremation practices can have significant negative environmental impact, but green funerals and eco-burials are one way to lessen the impact. While death can be a difficult subject, keeping ethical beliefs and environmental convictions in mind while tending to end-of-life arrangements can create a meaningful send-off–not to mention a lower-impact one. After all, if you gotta go, why not go green?

Top Green Funeral Tips

  1. Seek Good Advice
    Not long ago, the idea of green burial was unheard of by most funeral directors, and today, for a variety of practical and emotional reasons, many people still resist the idea. However, there are signs that the industry is awakening to the concept, especially since many people with environmental sympathies wish to leave the world as they have tried to live in it. A growing number of products and services can help them do just that. Key points to think about include: 


    • Funeral Director: Ask your funeral director about more sustainable options, or seek out a funeral home that offer green practices (more on this below).
    • Green Burial: Likewise, green burial specialists can help you explore greening your final resting options.
    • Literature on Green Funerals: Read one of the books that can guide you through the process. (See our “Where to Get this Stuff” section below for suggestions.)
  2. State Your Intentions If you are reading this guide with an eye to what happens to your remains when you are gone, it would make sense to talk to your loved ones about it or make arrangements ahead of time. Death can be a difficult process and, unless prompted, those left behind may not think to consider the environment in making arrangements. Even if they do, they may not have a grasp of the best and greenest courses of action to take. 


    • Define Your Wishes: Add a clause in your will or create an advanced funeral wishes document that stipulates your green funeral concerns. Consider including a copy of this guide with your instructions.
  3. Cremate Your Remains On the face of it, cremation doesn’t seem like a particularly green idea. Burning anything creates pollution, especially if there are toxic substances present (via embalming, for example), and returning nutrients to the ecosystem via decomposing matter is a core tenet of environmental thinking. That said, modern crematoriums have made significant reductions in emissions. Plus, as many cemeteries, particularly in the U.S., have rules and regulations stipulating the use of concrete vaults, coffins, and other such requirements that use significant resources and space, becoming one with nature isn’t as straightforward and simple (or quick) as it may seem. Cremation, therefore, may make more sense from a green perspective, after all. If it seems like the right choice to you, you can ask the crematorium about what they are doing to reduce emissions. A previous TreeHugger post also discusses more about efficient and green cremation. Another option that has been explored in Sweden involves freezing the body with liquid nitrogen, which breaks the remains down more rapidly. This method has been very controversial.
  4. Bury Your Remains Ultimately, our remains are part of the food chain. Unfortunately, many of the trappings of modern burial–such as embalming, hardwood coffins, and concrete vaults–are designed to delay the natural process of decomposition. Though these ideas have become modern standards, the truth is that anything we can do to return to the earth more easily will lessen our impact on the environment. See our previous article, The Green Goodbye, which explores new trends in eco-burials. Key ecological points include: 


    • Preservation: Embalming slows the decomposition process. For those whose tradition does not designate embalming as part of the burial practice, consider skipping this step, and opt for a closed casket and rapid burial.
    • Coffins: Cardboard, bamboo, or jute coffins, shrouds, or biodegradable urns are all dignified ways to unite with nature more rapidly.
    • Green Burial Grounds: The Green Burial Council and other organizations are taking strides to develop and identify sustainable burial and cremation practices, locations and companies.
  5. Leave a Living Marker It can be important for mourners to have somewhere to go to remember their loved ones long after the funeral is over. Natural or living memorials can be wonderful alternatives to quarried headstones or marble mausoleums. Consider planting a tree or a bush that will carry on in honor of the deceased. Online memorials are also becoming increasingly popular. For inspiration, New York’s New School and the The U.S. Forest Service have explored visions of the living memorial through their project, Land-markings: 12 Journeys through 9/11 Living Memorials.
  6. Give Gifts of Sympathy Cut flowers have a short shelf-life; besides, flower-farming can be a resource-intensive endeavor. It’s already common practice to ask for donations to charity in lieu of flowers; after all, what better way to remember the dead than to create a better world for the living? From organizations that provide solar power to the developing world to others that provide bicycles for AIDS caregivers, charity-giving is a magnificent way to honor the passions of deceased friends or relatives.
  7. Deliver a Just Tribute So much of what we hold dear about a person includes their ideals and convictions. It is fitting, then, to commemorate the life of a departed fellow TreeHugger with a memorial ceremony that touches on the subject of the environment. We are not suggesting a 10-hour lecture on Gaia Theory, but a joyful remembrance of a passionate green life well-lived. With more and more faiths and denominations fromCatholicism to Judaism and beyond embracing stewardship of the environment, it shouldn’t be hard to find a minister with sympathies for your cause. Green funeral providers and any funeral director will also be able to offer advice on how to create a unique, personalized ceremony.
  8. Green Your Funeral Service As with any event, much of the environmental impact is in the details. Even if you don’t opt for any of the ideas above, you can still make a funeral greener by incorporating the following practices into the gathering. 


    • Programs: Use recycled paper for programs or hymn sheets.
    • Flowers: Source any flowers from organic, local growers.
    • Procession: Make arrangements for carpooling from location to location during the funeral.
    • Refreshments: If the deceased was an environmentalist, the chances are they enjoyed local, organic food. If refreshments are being served, it makes sense then to look closely at where they come from. TreeHugger’s How to Green Your Meals provides helpful tips and guidelines for selecting the refreshments of your choice.
  9. The Ultimate Recycling We’ve already suggested that using biodegradable coffins or urns, and avoiding concrete vaults, can help reduce our impact by returning our remains to the earth. However, some folks are taking this even further by finding safe ways to literally compost human remains.
  10. Return to the Woods The woodland burial movement, which started in the UK, is widely credited with the birth of interest in natural funerals in general. Not only do woodland burials involve low impact ceremonies, they also aid in the return of a piece of land to a natural forest. Trees and native wildflowers are often planted above a grave, and because the location becomes dear to the families of the deceased, chances are good that the site will remain protected for years to come.


Cremation ceremonies in Varanasi, India || Dennis Jarvis/Flickr/CC BY 2.0


Green Funerals: By the Numbers

    • 56.5 million: The approximate number of people that die each year around the globe.
    • 50 million: Trees that are cut down in India each year for funeral pyres. This releases 8 million tons of carbon dioxide.
    • 270: The number of green and woodland burial sites in the U.K.
    • Up to 16 percent: Mercury emissions in the U.K. that come from crematoria because of the fillings in teeth. This percentage is expected to increase to 25 percent by 2020.
    • 1.6 million: Tons of reinforced concrete buried in the U.S. each year in the construction of vaults.

Sources: Yahoo!TreeHuggerDepartment for Environment, Food and Rural AffairsGreen Burial Council

Green Funerals: Getting Techie

Embalming became popular in the United States during the Civil War and is still a significant source of groundwater pollution today. Arsenic gave way to the less toxic formaldehyde as the favored embalming solution around the turn of the last century. However, formaldehyde poisoning can still be fatal and it is classified as a human carcinogen by the US Environmental Protection Agency. Some estimates say that one million gallons of formaldehyde are buried in embalmed bodies each year in the United States. Almost all of this will eventually make its way into our water supplies. Efforts are underway to gradually replace formaldehyde with glutaraldehyde, which is considered less toxic.


Cremation causes nitrogen oxides, carbon monoxide, sulfur dioxide, heavy metals and particulates to be released into the atmosphere when a body is cremated. If a body has mercury-amalgam fillings, the mercury will almost certainly become air pollution unless the fillings are removed first. Burning a body inside a coffin also creates significantly more pollution than burning the body by itself. Modern crematoriums often have ‘clean smokestacks’ that ameliorate the associated emissions, at least to some degree, and the cremation industry has claimed that reports of pollution have been greatly exaggerated.

Books
Caring for the Dead: Your Final Act of Love
Exit Strategy: Thinking Outside the Box
Grave Matters: A Journey Through the Modern Funeral Industry to a Natural Way of Burial
The Natural Death Handbook

============================================================================================

Deep-Frozen Woman ‘Denied’ Eco-Burial

 A.K. Streeter (@april2462) Living / Health March 2, 2012

Promessa AB/Screen capture
“Think About Death” the inscription at the Gothenburg cemetary reads.

Remember the story a few years back about an environmentally-friendly form of burial that sifted the toxic and valuable metals from corpses and put resulting nutrient-rich dust into biodegradable caskets to replenish the earth as compost?

OK, maybe you haven’t heard. But this type of eco-burial was the passion of researcher and business owner Susanne Wiigh-Mäsak, who formed a company, Promessa Organic AB, to help dead people that wish to quickly return to the earth. According to Wiigh-Mäsak, her method is much more sustainable than our current embalming in caskets, or cremation. Traditional casket-buried bodies are deeply buried, rot slowly and release methane as they do so, Wiigh-Mäsak has said. With Promessa’s process, powdered bodies will be shallowly buried and break down much more quickly.

Except that in Sweden, the freeze-drying and shallow burial of corpses has no precedent, so this new form of eco-burial has yet to go forward.

Thus the body of Jane Günther, who had herself frozen upon her death in 2009, is still waiting (thus far in vain) for the Swedish state to comply with her last wishes. Recently, the Swedish Tax Authority threatened to force conventional burial of Günther’s body against those wishes, as it seems there’s a legal limit for how long corpses can remain unburied.

Gunther is one of 12 Swedes to undergo the deep-freeze in anticipation of a Promessa-style eco-burial, while Wiigh-Mäsak waits for approval of her technique.

The main problem is that Swedish law only allows for two forms of burial – cremation, or burial in a casket. At Promessa, a body is first chilled down to -18C. Once she’s obtained permission for her process, Wiigh-Masäk’s clients will be dunked in liquid nitrogen (obtained as a byproduct of the medical industry) which freezes them to -196C. Wiigh-Mäsak says this makes a body very brittle, and subsequent agitation causes the body to break apart and eventually disintegrate. Heavy metals are then filtered out by means of magnets, and the remains put into a biodegradable corn casket and buried in a shallow grave. Wiigh-Mäsak says in 6 – 12 months the body will be rich compost.

“Whether we burn our body or bury it six feet under, we neglect the possibility of bringing our organic remains back to nature, thereby becoming part of a balanced process.” – Susanne Wiigh-Mäsak

Researcher Bengt Johansson isn’t convinced that the method will work. Wiigh-Mäsak has said she’s tested the method on hundreds of pigs, but she hasn’t publicly shared her research findings.

Johanssom, a professor of anatomy at Sweden’s Sahlgrenska Academy who has worked with freezing technology, told a Swedish newspaper he doesn’t believe bodies will react in the way Wiigh-Mäsak says they will, and wants further scientific, peer-reviewed proof.

So it’s a fight to the death, or beyond.

Wiigh-Mäsak is planning to build a Promessa facility this year to handle more burials with her method, which she calls promession.


DIY – Fly Trap

Posted on
Fly Trap – or feed the fish !
Description; Original article; http://chestofbooks.com/home-improvement/woodworking/Community-Shop-Projects/Fly-Trap.html

This section is from the book “Shop Projects Based On Community Problems“, by Myron G. Burton. Also available from Amazon: Shop Projects Based on Community Problems.

Fly Trap

Materials

Basswood (Chap. III., Par. 31).

8 pcs. 3/8″xl”xl2 1/2″ S 2 S Sides. 8 pcs. 3/8″xl”x 7 1/2″ S 2 S Cross pieces. 5 pcs. 1/2″x3/4″x9″ S 2 S Top pes.

8 pes. 1/4″x3/4″x9″ S 2 S Trim. 3 dozen 1″ brads.

3 dozen 1/2″ brads.

1 1/2 dozen 3/8″ corrugated nails.

1 yard 24″ screen wire.

9 dozen small tacks.

1 piece 5/32″ Bessemer rod 8″ long.

2 screw eyes No. 114.

1 pair 3/4″x3/4″ brass hinges. 1 small clasp.

Introductory Statement

Recent investigation has proven that the common housefly is a very dangerous enemy to human life. The fact that it spreads disease and is in every way undesirable is sufficient reason why everybody should be as careful as possible to prevent its increase. One of the most successful ways to wage war on flies is to screen our homes so as to shut them out, and then leave no uncovered garbage pails or any other feeding places for them.

In cities where everybody has been interested in disposing of flies the results have been very encouraging. School children have helped wonderfully by engaging in fly-catching contests.

You can do a great practical good for your own home and community by making this flytrap carefully and using it throughout the fly season.

References:

The House Fly as Disease Carrier, L. O. Howard. Published by F. A.

Stokes Pub. Co., New York. U. S. Bulletin No. 459, and U. S. Bulletin No. 679, House Flies. Insects and Disease, Doane. Henry Holt & Co. Our Household Insects, Butler. Longmans, Green Co. Household Insects and Methods of Control, Bulletin No. 3, Ithaca, N. Y. U. S. Bulletin No. 155, How Insects Affect Health. Fly Traps and Literature. International Harvester Co., Chicago. Winter War on Flies, Willard Price, Technical World, February, 1915. Our Insect Friends and Enemies, John Smith. J. B. Lippincott Pub. Co.

Fly Trap

Suggestions For Original Design

Glass Fruit Jar

WlTh Opening In LlD

Fly Trap Specifications

The Side Strips

You will probably have to rip your material from stock; select the best surface of your stock for a working face (Chapter II., Paragraph 2); plane one edge for a working edge (Chapter II., Paragraph 4). With the marking gauge, gauge the width of the strips on both surfaces of the stock (Chapter II., Paragraph 6). Rip just outside the line; plane to the gauge lines. Prepare all the side strips in like manner. Saw them the required length. Notice that on two sides of the fly trap, the side strips are narrower than on the other two sides. This is done so the four sides will be equal when assembled. Miter the lower end of each strip, as shown in the drawing.

The Side Cross Rails

Rip out and plane the side cross rails in the same manner in which you have made the side strips. Cut all these rails the required length, as shown in the drawing. They may be easily and accurately sawed in the square cut of a miter box.

Assembling The Body Of The Trap

Each side is merely a rectangular frame. Lay two side strips flat on your bench top with the two cross rails in such position as to form a frame; make the angles square and fasten with corrugated nails(Chapter II., Paragraph 23). Assemble all sides in like manner. Cut screen wire the proper size and cover the inside of each frame; fasten the screen wire in position with small tacks. Assemble the four frames box fashion; they should be joined with a plain butt joint (Chapter II., Paragraph 60) at each corner; fasten with brads (Chapter II., Paragraph 21).

The Lid

The lid is a square frame (with a cross bar in the middle for the handle) joined at the corners with plain butt joints (Chapter V., Paragraph 60), fastened with brads. Square the stock for the lid (Chapter II., Paragraphs 1, 2, 3 and 4); cut each piece the required dimensions; assemble as explained; cover with screen wire. Strips of wood 1/4″ thick are to be used as a trim on the lid, to cover the tacks and add to the appearance of the work; miter this trim at each corner (Chapter V., Paragraph 64); fasten it on with brads.

The Inside Wire Pyramid

In order to cut the screen wire for this piece you should make a pattern of paper; if you will draw fourtriangles (each of the size of one side, as shown in the drawing) adjoining each other, you will have a correct pattern. Allow about an inch to make the lap; bend into proper shape; with a piece of the wire weave the open corner securely together; place in position and fasten with tacks. These tacks may also be covered with a trim just as you did the lid.

The Handle

Bend the wire to form the handle; attach with two screw eyes. Fasten the lid in position with two small hinges and put on the fastening. Plane off uneven places if there are any. Stain some dark color (Chapter IV., Paragraph 54).

Optional and Home Projects Employing Similar Principles.

1. A very satisfactory and convenient fly trap may be made of any ordinary glass fruit jar, as shown in the Suggestions. The entire central portion of the lid is cut out. A slender cone is made of screen wire with a small opening at the point. This cone may be attached to the lid by having a number of small holes punched around the opening in the lid, through which a small wire can be so woven as to bind the cone securely. A thin piece of wood, with four tacks or small nails, so driven as to extend slightly above the surface, will make a satisfactory base. In a trap of this kind the flies may be easily killed by pouring in boiling water.

2. An all-metal fly trap can be made from the lid of an old paint bucket, a few scraps of heavy fence wire and a piece of screen wire. The screen wire is rolled into a cylinder just as large as the bucket lid, which is to form the top. The screen wire cylinder is woven to the rim of the lid through small holes, as indicated in the drawing. A hoop of fence wire of the same diameter as the lid is attached to the other end of the cylinder, to hold it in shape. The inside cone of screen wire is attached to a second hoop of the same size as the first. The cone is placed in position, and if properly made will fit so closely that it will not require fastening. Small pieces of wire may be attached to form legs about a half-inch long. A sheet of tin, or an old pie tin will answer for a base.

Swimming pool – au natural

Posted on
printlogo-1329425488189.jpeg
A Natural Swimming Pool That Works for You

By John Robb (Resilient Communities). http://www.resilientcommunities.com/?inf_contact_key=284fdcfb53503b6d362a75d5644c49bb571874cfb5a179fc85273259247b692e

Robb writes on all sorts of interesting topics – here he teams up with  Shlok Vaidya as contributer

When I was a pilot, I spent years surveying the built environment from above.

One thing that amazed me is how many people own swimming pools.  In some areas of the country, it seems that nearly everyone has a pool (in some cases, the pool is almost as big as the footprint of the home itself).

But things have changed.  We don’t have the luxury of allocating that much space to a sterile, unproductive pool of water that requires constant attention and financial support?

We need to put that space to work.

But are there any other options?  Is it possible to build a pool that does more than just support our playtime?

I believe there is.   It’s called a natural pool.

20130329-113853.jpg

The natural pool, doesn’t fight nature tooth and nail.  It embraces it in a very tangible way.

Instead of engaging in chemical warfare, the natural pool uses an ecosystem of plants to cleanse and filter your swimming water.  To do this, designers create a wetland in a shallow and distinct area of a pool to act as a biological filter.

20130329-114229.jpg

This include the following components:

  • Microorganisms. For example, zooplankton eat algae to keep your water clear.
  • Aquatic plants. They absorb the nutrients that the bacteria break down. Indigenous plants are used as much as possible. You can also grow edible plants, for example, rice, watercress, or wasabi.
  • An inert substrate. This way the plants are forced to draw their nutrients from the water itself, thereby keeping the water clean.
  • Retaining wall. Enables water flow between the two areas but prevents the plants from doing so.

In practice, the shallow water of the wetland area is circulated into the deeper water of the swimming pool.

This circulation enables your bio-filter to cleanse the water as it goes. Upkeep is minimal – one simply has to trim the plants as necessary and remove fallen leaves.

There are no chemicals to buy, minimal electricity costs (one pump), and no PH level monitoring. If needed, the bio-filter can be supplemented with an automated skimmer or UV sanitizer.

As an added bonus, because the wetland is a distinct area, it can be added to an existing pool in a retrofit with minimal additional digging.

Resiliently Yours,

 JOHN ROBB;- Resilient communities.

PS: Because the pool is designed for circulating water, the threat of mosquitoes is minimized.  Additionally, wildlife (frogs, dragonflies) will be attracted to the vegetation-filled part of the pool you don’t swim in. They’ll provide a free pest management service.  In contrast, when a chemically treated pool isn’t maintained, it can quickly collapse into a cesspool of larva (as we saw during the foreclosure tsunami a couple of years ago).

PPS:  I’ve been experimenting with aquascaped environments over the last couple of months, and I can attest that these systems can take care of themselves if you build the system correctly.

Resilient communities editor, Shlok Vaidya, contributed to this letter.

=====================================================================================

Natural swimming pools provide all of the fun of a standard swimming pool, but without the chemicals and the maintenance.    As you can see below, a natural pool system can turn a recreational pool into a productive asset rather than merely a chemically laced cost center.

Planted ponds

The secret to a natural pools is something called a biofilter.  To clean the pool, you pump water through the biofilter (images via Gartenart).

GartenArt

What is a biofilter?  It’s usually made with porous rocks or gravel.  Essentially, any material that has nooks and crannies that bacteria can breed in.  With a biofilter, you actually want the bacteria to grow because they eat the pollutants in the water, cleansing it in the process.

Sustainability in Older Buildings.

Posted on

Improving the Insulation on Older/Poorly-Built Buildings.

AKA Raising the B.E.R. on (older) buildings.

The B.E.R. Rating. Building Energy Regulations of a building means to improve it’s insulation and ultimately to lower its eco-footprint and cost in terms of fuel-consumption. It’s a frightening thought that buildings bought before the UK building boom of the ‘80’s (Ireland of the late 90’s) now cost more to heat per year than the initial cost of the building itself. Fuel prices have risen at 1.5 times the rate of inflation over the last 30 years.

It is generally accepted (B.E.R. standards, LEED (US), SAEI- Ireland, Department of Energy and Climate Change (DECC); UK) that 35% of heat is lost from a building via poorly insulated walls.

Heat is lost in ALL directions.

Heat is lost in ALL directions.

The overall heat loss from a building can be calculated as

H = Ht + Hv + Hi   where H = overall heat loss (W)

Ht = heat loss due to transmission through walls, windows, doors, floors and more (W)

Hv = heat loss caused by ventilation (W)

Hi = heat loss caused by infiltration (W).

Heat-loss in buildings (or heat0gain in warm lands demands the value of the building every generation or less nowadays. (Protek-usa. Heat-Gain-Loss-Buildings.pdf). this pdf starts with a very good definition of heat loss via radiation, conduction and convection.

N.B. Sand-cement render on the exterior of a building (especially if insulating the interior) will result in the building ‘sweating’ and possibly developing Merulius lacrimans – dry rot – or -Serpula lacrimans – ‘Real-Dry-Rot’). Both will destroy a building and even its neighbours. If a house is to be ‘sealed’ great care must be taken that it remains “breathable”.

There are two (generally) accepted ways of insulating a building (insulating the envelope);

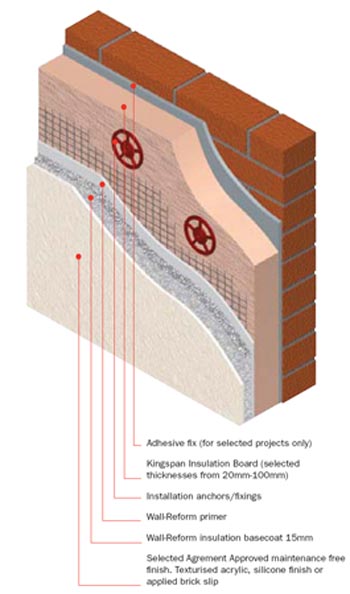
External; “Bubble-wrapping” the exterior – e.g. polystyrene slabs fixed to the exterior walls (using plastic ‘mushroom’ plugs) and plastering with a patent-polybond-skim over a mesh that holds all in place. This technique ‘defaces’ the exteriors and ‘technically’ needs planning permission.

Cross-section of external insulation.

Cross-section of external insulation.

Internal; fitting patent pre-insulated slabbing to interior walls (ceilings too if possible) to retain the heat generated within the building. Fixed as above or with laths between wall and slab this system is usually seen as the best as it retains heat before it hits the exterior wall and is absorbed (before being lost if there’s no external insulation). This system is often eschewed as it reduces the volume of the room (room-size) considerably in small homes/offices. It is seen as the most desirous in larger buildings as the heat is retained and in fact rather like any light-weight structure (boat-caravan) is easily heated very quickly.

In both cases however the incidence of leakage (drafts) and of course doors, window, and especially glazing must be considered. Poor glazing techniques (ie single-glazing or poorly designed/compromised/faulty) can cost 23% heat loss normally but even far more if the rest of the structure is well insulated.

From seai.ie/(Power_of_One) ; “Internal insulation systems involve using insulated dry-lining boards. These boards comprise of 12.5mm of plasterboard with insulation bonded to the back with a vapour barrier between the two. The insulation ranges in thickness from about 25mm to approximately 60mm though this depends on the make and availability. A lot of these boards would have similar levels of thermal conductivity because the main types of materials that are used, i.e. polyurethane and polyisocyanurate, have very similar thermal properties. However, it has the disadvantage of placing the thermal mass of the wall outside your heating envelope. External insulation is another option, which would have the added advantage of keeping the thermal mass of the concrete walls within your envelope. It is very popular method in Europe, and is becoming more common in Ireland. With external insulation, the insulation panels are applied to the walls, then a protective mesh that protects the insulation against impact damage is applied, then a basecoat and usually two coats of render”.

Floors are often disregarded as it’s generally thought that heat rises – which is true. But as temperature rises within a structure the heat will always seek to find a way out; even downwards. Floor insulation must reflect what is planned above. 15% heat loss is the accepted figure but again as the better insulation of the upper areas improves the rate of loss through the floor will increase.

Air Seal

A gap of just 1/8 of an inch under a 36-inch door lets in as much air as having a 2.4 inch wide hole in the wall. Since people often adjust the thermostat and leave heat running longer when they feel a draft, preventing air infiltration can greatly reduce energy usage. See ‘Notes’ below.

Air-pressure-tests and infra-red video cameras

will show leaks and vents as well as ‘cool-spots’ in covered areas that are lacking insulation.

Detailed business information on Air Pressure Testing Companies located in the UK, including photos, contact details and customer reviews. freeindex.co.uk/air_pressure_testing/

Heat-Exchange Systems. aka Heat Recovery System.

No discussion on heating/cooling any building can Not but consider ‘heat-exchange-system’ see; Heat-Exchange Systems.

Heat-exchange.

Heat-exchange.

Geo-Thermal.

‘Geo-thermal’ means absorbing some of the latent heat from the earth (or running water/large body of water) and enhancing the heat by passing it through a heat-exchanger – the inverse of a milk pasteurising system. It’s usually used for underfloor systems (at about 33ºC) though new radiators are coming on the market to work with low-heat-radiators.

Geothermal-Heating-Systems simple

————————————————————————————————————————————-

I opened a website on heating on old home and one thing jumped out at me – I hadn’t mentioned the last time – THE most obvious and the FIRST thing ones does – AUDIT. If it ain’t measured it won’t count (or get done).

It’s the most important thing to do – with any structure. Don’t waste money/time until you know where the leaks are. An ait-test and infra-red camera wre the best way to see where the warm air is leaking and where the insulation is needed. Before and AFTER remedial work; More information on blower door tests>>
See; epa.gov/sustainable/energyadvice. Improve Your Home’s Energy Efficiency – Start With an Energy Audit!
  • Search for articles on old house websites such as the Old House JournalExit EPA Disclaimer
  • Reference books such as Greening Steam: How to Bring 19th Century Heating Systems in the 21st Century (and save lots of green!) by Dan Holohan
  • Ask a question online at www.heatinghelp.com
Get this article – very American but less chance that your lecturer will have seen it, excellent resource; scientificamerican.com/are-old-houses-doomed-the-conflict-between-historic-preservation-and-energy-efficiency  
It’s really difficult to super-seal an older structure though with stone there’s a better chance than wooden/timber-framed however there are a large number of green features and design principles are simply impossible to incorporate in any building after the fact. 
Scotland – links and news; Scotland.national-retrofit-programme 
Heat requirements for the building; Can I fit underfloor heating in an old house?
‘A major factor with UFH in a renovation project is the heat requirements for the building. A system will have a specific max. output, dependent on floor type, and if insulation is limited – e.g. if you have period single glazing and solid walls – it will be difficult to get comfortable room temperatures in very cold weather. Any company you work with must carry out a full heat-loss calculation room by room. It’s also best to have a temperature controller for every room.
‘The two main floor types in old buildings are screeded and timber-suspended. The screeded floor will give a higher heat output, but you will have more difficulties installing UFH, because you will have to dig out the original floors – or lose a lot of headroom putting down a new floor on the original. A timber-suspended floor will accept UFH onto your original joists and give a floor lift of about 1.5cm and so, in many ways, offers an easier option.’ However the insulation must be ‘top-notch- foil-backed etc to ensure heat doesn’t take the easy option of ‘heading South’ – literally. Heat will ALWAYS go to the cold(er) areas.
UK ‘Green Deal’ offers ideas, grants and actual help; gov.uk/green-deal-energy-saving-measures/how-the-green-deal-works Once again they start by demanding one gets an AUDIT first. If it ain’t measures it can’t be counted!! However there are pitfalls to be negotiated; See Gardian article; Guardian.co.uk/green-deal-consumers-beware-nasty-surprises
Whilst double glazing and carpets are a good start, draught proofing and insulation of suspended floors will be a benefit and for solid floors, the addition of thick underlay and/or insulation. Internal or external solid wall insulation are required to make flats really low energy and will make them really cosy and eliminate many of the condensation and mould issues associated with cold walls, but this should be considered as part of a comprehensive low energy strategy, that in-cavity wall insulation can lead to damp issues in rare cases. For example, the insulation could offer a path for wind driven rain if the external wall is highly porous, poorly pointed or cracked, or the building is extremely exposed. This risk may be reduced if bead insulation is used instead of fibre, but there isn’t much research on this. Breathability is essential !!
In buildings where part of the wall is solid, for example in ring beam construction, the warmer insulated walls may accentuate condensation at the corner of the wall with the floors and ceilings. Finally, the insulation may reveal building faults such as blocked weep holes or missing cavity trays.cludes heating, ventilation, lighting, appliances and renewable systems.The most cost effective way of minimising draughts from a disused chimney is to use a chimney ballon. 1010global./energy-saving-old-homes;
Doing a bit is better than doing nothing – wearing a hat and no gloves is much better than no hat & gloves.
 
Schools, UK;  Here, Robert De Jong, LessEn programme manager at the ULI, explains the findings, outlines how Dorset topped the table through its sustainable property team and provides schools with tips on how to become more energy efficient.
http://www.educationbusinessuk.net/features/43/2542-learning-lessons-in-energy-efficiency-from-the-star-performers
 
Climate debate
A basic misunderstanding skews the entire climate debate. Experts on both sides claim that protecting Earth’s climate will force a trade-off between the environment and the economy. According to these experts, burning less fossil fuel to slow or prevent global warming will increase the cost of meeting society’s needs for energy services, which include everything from speedy transportation to hot showers. Environmentalists say the cost would be modestly higher but worth it; skeptics, including top U.S. government officials, warn that the extra expense would be prohibitive. Yet both sides are wrong. If properly done, climate protection would actually reduce costs, not raise them. Using energy more efficiently offers an economic bonanza–not because of the benefits of stopping global warming but because saving fossil fuel is a lot cheaper than buying it. Scientificamerican.com/more-profit-with-less-car

Passive-Solar Heating. (aka the No-Brainer).

What is a Passive House? It is a building in which a comfortable interior climate can be maintained without active heating and cooling systems. The house heats and cools itself, hence “passive”. By good design and an average 10% ‘extra-spend’ in design and building will eventually save many 10’s of thousands of Euro or Pounds in fossil-fuel heating-bills (and airconditioning). See; http://passiv.de/en/

However as we are discussing older buildings we must assume that other than physically turning a building on its axis to avail of ‘solar-gain’ and to build (sympathetically) around it possibly with a forest to cut-down on chill-factor to NW, N, NE. We must concentrate on apertures, walls, roof and flooring. Further measures – keeping the heating-bills down by reducing the temperature by a degree or two can be found in this pdf; london.anglican.org/Church-heating.pdf

A book issued hand-in-hand with the Anglican Church offers help; Creed and Creation: A simple guidebook for running a greener church. 2007.

Flooring: When insulating the floor is it possible to add underfloor heating? Underfloor heating uses water heated to 33ºC as opposed to ‘normal’ heating (radiators) which runs at 65ºC.

Notes on insulation and ‘off-grid’ homes;

Australia; A push has been made to help homeowners in providing their own power. Renewableenergyworld.com/push-for-homes-to-be-powerhouses

In France A push has been made to tax energy wasters and feed that money towards homeowners insulating and providing their own power.; Renewableenergyworld.com/france-taxing-carbon-emitters-in-an-effort-to-overhaul-consumer-energy-costs

A newly constructed apartment complex in Newport News, Va., proves that that future may already be on the way. The Radius Urban Apartment complex windows fabricated with Solarban 70XL glass and SunClean self-cleaning glass by PPG Industries. That’s right, windows that will shrink your energy bill and clean themselves. And they’re both Cradle-to-Cradle certified.

According to the company, Solarban glass is a transparent solar-control, low-emissivity glass that lets light through while also acting as thermal insulation. By transmitting high levels of daylight while blocking the sun’s heat energy, windows made with Solarban 70XL glass can reduce summer cooling costs by as much as 25 percent. PPG also claims that Solarban 70XL glass can cut furnace heat loss through windows in half, which can lower heating bills significantly in the winter months.

And now for the best part: SunClean glass is formulated with a proprietary coating that becomes “photocatalytic” and “hydrophilic” after prolonged exposure to sunlight. Photocatalysis enables the coating to gradually break down organic materials that land on its surface, while hydrophilicity causes water to sheet when it strikes the coating so that decomposed materials are naturally rinsed away when it rains.  Earthtechling.com/self-cleaning-solar-glass-is-a-lazy-mans-dream/

References;

Airpressure,   http://www.proair.ie/index.php?option=com_content&task=view&id=54&Itemid=43

Creed ; Creed and Creation: A simple guidebook for running a greener church, Gillian

Straine & Nathan Oxley, Aldgate Press, 2007

Department of Energy and Climate Change (DECC); https://www.gov.uk/government/organisations/department-of-energy-climate-change  Accessed 25/01/2013

Heat-Exchange Systems.

National Archives; http://webarchive.nationalarchives.gov.uk/+/http://www.berr.gov.uk/energy/statistics/index.html Accessed 25/01/2013.

Protek-USA; http://www.protek-usa.com/pdf-new/Heat-Gain-Loss-Buildings.pdf

RESATS; https://restats.decc.gov.uk/cms/welcome-to-the-restats-web-site/ Accessed 26/01/2013

Telegraph – radiatorshttp://www.telegraph.co.uk/property/propertyadvice/jeffhowell/8214378/Home-improvements-how-to-heat-the-house-this-winter.html  Accessed 27/01/2013.

Links and Resources;

Dublin Heritage-Conservation Dublincity.ie/Planning/HeritageConservation/Conservation/pdf

Heat loss for engineers; http://www.engineeringtoolbox.com/heat-loss-buildings-d_113.html

How to get free cavity wall and loft insulation; It’s not too late to get free insulation installed in your home. And if you’re on a low income or benefits, you could get cash or vouchers as well. http://uk.finance.yahoo.com/news/free-cavity-wall-loft-insulation-160620453.html

Don’t qualify? You can still save on insulation: If you don’t qualify for free insulation for whatever reason, you can still get discounted installation with all of the major energy companies, and others such as Sainsbury’s Energy.

A detailed guide to insulating your home. ExternalWall Insulation Systems (EWIS) can be used on new or existing buildings;  http://www.youngdesignbuild.ie/EWIS.html

Sempatap Thermal Solid Wall Insulation Materials & Tools; http://www.youtube.com/watch?v=gKXb9fx9cmw

Passive House (Passivehaus); For passive construction, prerequisite to this capability is an annual heating requirement that is less than 15 kWh/(m²a) not to be attained at the cost of an increase in use of energy for other purposes (e.g., electricity). Furthermore, the combined primary energy consumption of living area of a European passive house may not exceed 120 kWh/(m²a) for heat, hot water and household electricity. The combined primary energy consumption of living area of a standard house is approximately 220 kWh/(m²a) for heat, hot water and household electricity. External Links for more information: http://www.passiv.de and www.europeanpassivehouses.org  More info on ‘passivehaus’; The main design features of passive homes include: –

  • Positioning of homes and buildings to avail of free solar energy. Orientation and selection of the correct site for your home is imperative. Proximity to and height of adjoining buildings can reduce your solar gain.
  • Higher levels of insulation help reduce the cost of heating.
  • Air tightness of your home is crucial in keeping all that free solar energy within the home.
  • Locating the majority of your windows on south facing elevations and reducing the size of any north facing windows.
  • As your home is now extremely air tight, mechanical ventilation will need to be introduced. By ensuring that this ventilation has heat recovery the incoming fresh air shall be preheated by the extracted air. This simple measure helps keep your home warm without having to reheat the fresh air.
  • Correct detailing of junctions between the external fabric and windows and doors to reduce heat loss.
  • Introducing solar panels will help produce approx. 70% of your required hot water once sized correctly and positioned to face south to optimise the solar gain.
  • Other simple measures such as using A rated kitchen appliances and fitting low energy light bulbs will help ensure your new home is both comfortable and warm to live in.

Grants;

Ireland; Better Energy Homes Scheme; see:- Citizensinformation.ie

UK; Solid wall insulation – Energy Saving Trust .www.energysavingtrust.org.uk

Solid Wall Insulation Grants, Home Insulation Grants; www.governmentgrantssolidwallinsulation.co.uk

Cavity wall insulation –  Homes – Energy Saving Trust; www.energysavingtrust.org.uk

Notes.

Air-pressure Testing; http://www.freeindex.co.uk/categories/industry/industrial_services/air_pressure_testing/

Reasonable behaviour;

Make sure that there are no unnecessary obstructions in front of radiators, heaters and air ducts. · Bleed and clean your radiators on a regular basis to ensure water circulates properly. Clean off the fluff and dust from the grill and filters of convector radiators and heaters.  Install thermostatic radiator valves (TRVs) to prevent spaces from becoming overheated.

Air Seal

A gap of just 1/8 of an inch under a 36-inch door lets in as much air as having a 2.4 inch wide hole in the wall. Since people often adjust the thermostat and leave heat running longer when they feel a draft, preventing air infiltration can greatly reduce energy usage. Sealing up those cracks will make you feel comfortable and keep more money in your pocket. Remember for every cubic foot of heated or cooled air (that you have paid to condition) that leaves your house, one cubic foot of outside air enters!

Looking for just one thing you can do to improve your home’s energy efficiency? Significantly reduce air infiltration. Gaps or cracks in a building’s exterior envelope of foundation, walls, roof, doors, windows, and especially “holes” in the attic floor can contribute to energy costs by allowing conditioned air to leak outside.

Most Common Sources of Air Infiltration:

  • Bypasses (attic access door, recessed lighting, plumbing stacks, dropped soffits, open frame construction, duct penetrations, electrical penetrations, etc.) in the attic floor regardless of the presence of insulation, which by itself is not an air barrier. If you see dirty insulation, air is getting through.
  • Between foundation and rim joist
  • Crawl spaces
  • Around the attic hatch
  • Between the chimney and drywall
  • Chimney flue
  • Electrical and gas service entrances
  • Cable TV and phone line service entrances
  • Window AC units
  • Mail chutes
  • Electric outlets
  • Outdoor water faucets entrances
  • Where dryer vents pass through walls
  • Under the garage door
  • Around door and window frames
  • Cracks in bricks, siding, stucco and the foundation
  • Mudrooms or breezeways adjacent to garages

How radiators work; Telegraph (UK);

As the water flows through the radiators it gives up its heat to the rooms, thus returning to the boiler at a lower temperature. Designed by the Prussian-born Russian; Franz San Galli

A Low temperature heating system requires a larger surface area to provide enough heat energy. Radiators need to be up to 100% bigger to compensate for the lower temperatures. In other words it contains more mass and area.

Sources:

http://www.shrinkingthefootprint.cofe.anglican.org

http://www.ecocongregation.org/englandwales/index.html

http://www.christian-ecology.org.uk/noah/index.htm

http://www.carbontrust.co.uk/

http://www.churchcare.co.uk/atoz_heating.php

London Care of Churches Team

November 2007

The Engineering Toolbox; provides;

1. Heat loss through walls, windows, doors, ceilings, floors, etc.>

The heat loss, or norm-heating load, through walls, windows, doors, ceilings, floors etc. can be calculated as

Ht = A U (ti – to)         (2)

Where; Ht = transmission heat loss (W)

A = area of exposed surface (m2)

U = overall heat transmission coefficient (W/m2K)

ti = inside air temperature (oC)

to= outside air temperature (oC)

Heat loss through roofs should be added 15% extra because of radiation to space. (2) can be modified to:

H = 1.15 A U (ti – to)             (2b)

For walls and floors against earth (2) should be modified with the earth temperature:

H = A U (ti – te)             (2c)

Where; te= earth temperature (oC)

Overall Heat Transmission Coefficient

The overall of heat transmission coefficient – U – can be calculated as

U = 1 / (1 / fi + x1 / k1 + x2 / k2+ x3 / k3 +..+ 1 / fo)             (3)

Where; fi = surface conductance for inside wall (W/m2K)

x = thickness of material (m)

k = thermal conductivity material (W/mK)

fo= surface conductance for outside wall (W/m2K)

The conductance of a building element can be expressed as:

C = k / x         (4)

Where; C = conductance, heat flow through unit area in unit time (W/m2K)

The thermal resistivity of the building element can be expressed as:

R = x / k = 1 / C         (5)

Where; R = thermal resistivity (m2K/W)

Using (4) and (5), (3) may be modified to

1 / U = Ri + R1 + R2 + R3 + .. + Ro             (6)

For walls and floors against earth (6) should be modified to

1 / U = Re + SR             (6b)

2. Heat loss by ventilation

The heat loss due to ventilation without heat recovery can be expressed as:

Hv = cp ρ qv (ti – to)         (7)

Where; Hv = ventilation heat loss (W)

cp = specific heat capacity of air (J/kg K)

ρ = density of air (kg/m3)

qv = air volume flow (m3/s)

ti = inside air temperature (oC)

to = outside air temperature (oC)

The heat loss due to ventilation with heat recovery can be expressed as:

Hv = (1 – β/100) cp ρ qv (ti – to)         (7)

Where; β = heat recovery efficiency (%)

An heat recovery efficiency of approximately 50% is common for a normal cross flow heat exchanger. For a rotating heat exchanger the efficiency may exceed 80%.

Resilient Communities – by John Robb

Posted on

This is a series of interesting blogs by John Robb. I can claim no credit other than to acknowledge posting them for educational purposes- only. I find that some of these are brilliant, and some  … less so and I can only gather and collate.

Some have inspired me further and some have left me wondering if there’s hope for the human race – however not all of us are  experienced and we all need an ‘in’ – somewhere to get started. Dear reader I leave that to you. I post this to hope to motivate you and perhaps you too will get the RSS directly and join in Robs – Resilient Community.

——-              =======================        ———-

printlogo-1329425488189.jpeg
What I Found Interesting This Week 1/19/2013
By John Robb

What makes a home valuable in the 21st Century?

Increasingly, it’s whether the home or the community it is in produces food, energy, and water in abundance.

A home or community that does that well, is a gem.  A place and a way of life that will be sought after.   So, on that note, here’s some ideas I found this week on how to add this capability to your home and community today.

If you are like me, you love to own a greenhouse (or an green-atrium).   For me it’s both the productivity it provides and the aesthetics it adds to a home.  When I think about a greenhouse, I typically think of something akin to thissuburban life support system.

Suburban<br /><br /><br />
Greenhouse

Note how the greenhouse is almost as large as the home itself — given that, I’ll give them a pass on the wasted yard space!

However, a greenhouse that big may not be something you can justify yet.  Over time, that will change as growing organic, healthier, high quality food at home and locally becomes easier and more desirable/necessary to do.  In the meantime, you might want to look at smaller, stand alone structures.

If you want to go fully DIY, using recycled materials, here’s aschool project that used plastic bottles that may motivate you:

Recycled<br /><br /><br />
Greenhouse

For those into Buckminster Fuller’s geodesic domes, here’s a simple kit called Starplate (you can purchase it here), that you can use for both a greenhouse and a chicken coop.   It’s basically a set of metal connectors, you buy standard wood (i.e. 2×4), cut it, and assemble it.

Starplace

Here’s also a Geodesic dome kit and software tool for designing and building light weight domes yourself.  It was funded on Kickstarter in 2011 and it delivered ($99 for the kit).   Note that this kit uses dowels and flexible plastic connectors.  So, if you add a covering, it’s probably best to use it for “shading” plants with cheese cloth during extreme heat.  If you do, watch out for the wind.

Domekit

Speaking of wind or heat… If you live in a place that features both, you may want to build a submerged greenhouse.  Here’s an example of one from project FLORA.  It uses the ground as a heat sink (a place that stores extra heat when you have too much or a source of heat when you have too little) and as a shelter against the wind.   This design will help the greenhouse maintain even temps and it will minimize damage to the structure.

Desert<br /><br /><br />
Coolhouse

If you like the idea of a convertible greenhouse — one that you can open and close with minimal effort — here’s an amazing design from a company in Montana.  Unfortunately, the systems are a little pricey and I haven’t found a good DIY design.

Convertible Greeenhouse

If you are really ambitious.  Here’s a self-contained greenhouse called the “Integrated Food and Energy System” that’s being prototyped right.  It combines solar panels (for energy and shade) and aquaponics to produce lots of food in harsh climates (from urban jungle to desert) with minimal inputs.

food palace

Remember, adding a greenhouse is a good way to improve the productivity of your home.  However, don’t over-invest in a greenhouse if you haven’t established a gardening routine yet.  I also suspect a greenhouse + some help from a localfoodscaper (a local farmer or master gardener that delivers organic and micro-farming expertise to subscribers for a fee) would be an extremely effective combo.

Hope this helps get your head around the possibilities.  Keep adding value to your home and your community.  The future is what you make of it.

Resiliently Yours,

JOHN ROBB